-
Product center
-

New product area
-

Electronic universal testing machine
-

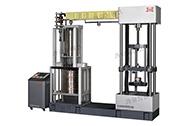
Hydraulic universal testing machine
-

Pendulum impact testing machine
-

Drop hammer impact testing machine
-

Special testing machine
-

Dynamic fatigue testing machine
-

Fluid pressure testing machine
-

Spring testing machine
-
Standard machine
-
Horizontal testing machine
-
High temperature creep endurance testing machine
-
Automated test scheme
-
-
Accessory center
-
Test scheme and case
-
Service support
-
News information
-
Enter the world
-
Contact us